Ceph’s RADOS Gateway (RGW) is a powerful object storage service offering an S3-compatible service. Integrated into your existing Proxmox-managed Ceph cluster, RGW allows you to build scalable, distributed storage solutions ideal for backups, application data storage, and archival. If performance is right, even the famed AI & Machine Learning tools can pull your datasets!
This guide is written for readers who are new to Ceph RGW, highlighting core concepts, network, and storage architectures before jumping into step-by-step deployment.
Understanding Ceph Object Storage (RADOS Gateway)
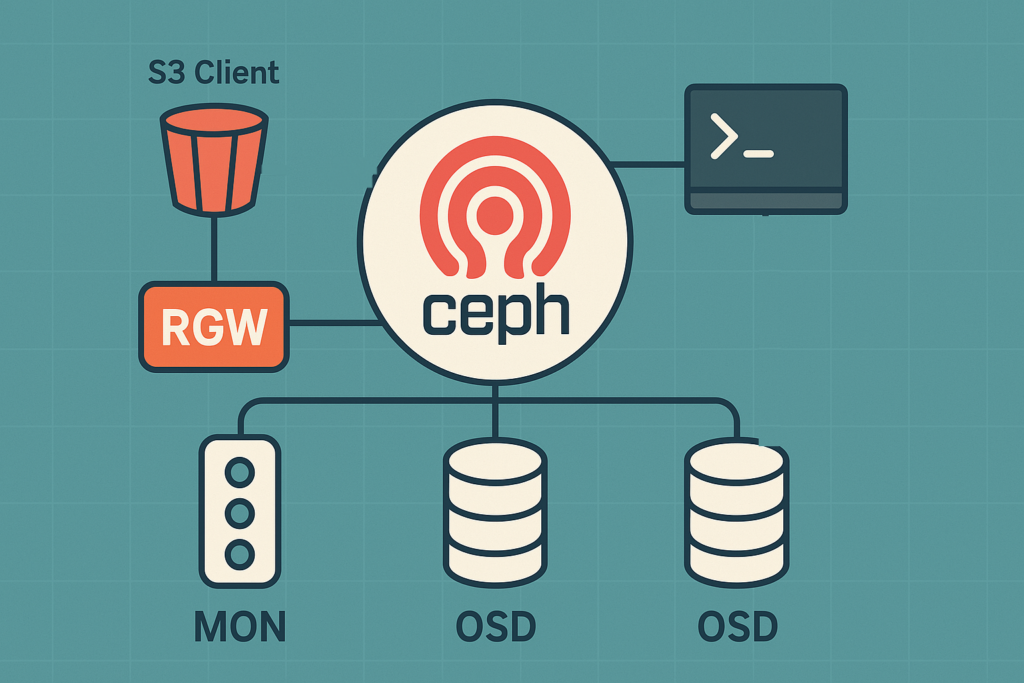
Ceph RGW (RADOS Gateway) is an HTTP-based gateway (web application, basically) that allows you to store and retrieve objects via RESTful APIs. It integrates seamlessly with the underlying Ceph cluster, using Ceph’s reliable and highly scalable RADOS storage backend.
Key components of RGW include:
- Realm: A global namespace encompassing one or multiple sites or clusters.
- Zonegroup: Groups multiple zones (sites) into a logical unit for data replication and management.
- Zone: A deployment of RGW within a specific cluster or location.
RGW leverages Ceph’s native replication and fault tolerance, storing data in object pools managed by Ceph’s OSD (Object Storage Daemon) nodes.
Network Architecture
The Ceph RGW is typically deployed on nodes with “public” network interfaces to allow access by clients and applications. I say “public”, as I mean public relative to the Ceph private network. RGW communicates internally with the Ceph cluster (OSDs, MONs) over your Ceph private or backend network, while external client communication occurs over standard HTTP/HTTPS protocols on ports like 7480 (default).
A common architecture involves placing RGW behind a reverse proxy (like Caddy or HAProxy) for secure and load-balanced external access.
Storage Architecture
Objects uploaded via RGW are stored directly in Ceph’s RADOS storage pools, distributing data evenly across multiple OSD nodes. Ceph manages redundancy, scaling, and fault tolerance, making it resilient to individual node failures.
Objects uploaded via RGW are stored directly in Ceph’s RADOS storage pools, distributing data evenly across multiple OSD nodes. Ceph manages redundancy, scaling, and fault tolerance, making it resilient to individual node failures.
The redundancy and fault tolerance for objects stored via RGW depend directly on the underlying storage pools configured in your Ceph cluster. For instance, if your storage pool is configured for replication across multiple nodes within a single cluster and single site, your stored objects will inherit this protection, providing resilience against individual node failures but not site-wide outages.
To achieve higher levels of resiliency, such as multi-site replication, Ceph RGW supports multisite deployments. By configuring multiple zones and zonegroups across geographically dispersed clusters, RGW can replicate data asynchronously or synchronously between sites, protecting against entire site failures. This multisite replication ensures data consistency, redundancy, and high availability for mission-critical applications. Detailed guidance on setting up multi-site RGW replication can be found in Ceph’s Multisite documentation.
Deployment Steps
Step 1: Confirm Cluster Health
As always, ensure your environment is operating correctly before making changes:
ceph -sConfirm the status is HEALTH_OK. Address any issues first, referencing Ceph’s troubleshooting documentation if necessary, or contacting us.
Step 2: Install RGW Packages
Install radosgw on the node designated for RGW deployment:
apt update
apt install radosgw -y
Note: Technically, you can deploy RADOS Gateway anywhere, as long as it has network connectivity and authentication to the Ceph cluster. For simplicity, we are installing directly on the Ceph nodes but you could deploy radosgw on a Proxmox VE LXC container or Virtual Machine, or dedicated physical servers. It will still act as a HTTP frontend to the RADOS service in Ceph.
Step 3: Configure Realm, Zonegroup, and Zone
Ceph RGW requires a namespace structure that logically organises data across deployments.
Configure these with the following commands:
# Create a new RGW realm, marking it as default
radosgw-admin realm create --rgw-realm=default --default

# Create a master zonegroup within the newly created realm and set it as default
radosgw-admin zonegroup create --rgw-zonegroup=default --master --default

# Create a master zone within the newly created zonegroup and set it as default
radosgw-admin zone create --rgw-zonegroup=default --rgw-zone=default --master --default

# Commit these configuration changes
radosgw-admin period update --commit
These commands create a foundational namespace setup suitable for single or multisite configurations.
Check out Ceph’s Multisite documentation for more information.
Step 4: Create a Ceph user for RGW
The RGW daemon needs access to the Ceph cluster in order to integrate with it. To do this, we need to create a new Ceph user:
ceph auth get-or-create client.rgw.<hostname> osd 'allow rwx' mon 'allow rw' mgr 'allow rw' -o /etc/ceph/ceph.client.rgw.<hostname>.keyringProxmox VE, by default, does not store keyrings or configure Ceph to look in the /etc/ceph/* directory for keyrings. We need to copy the keyring:
cp /etc/ceph/ceph.client.rgw.<hostname>.keyring /etc/pve/priv/ceph.client.rgw.<hostname>.keyringStep 5: Create a Data Directory for RGW
mkdir -p /var/lib/ceph/radosgw/ceph-rgw.<hostname>
chown -R ceph:ceph /var/lib/ceph/radosgw/ceph-rgw.<hostname>
This directory is critical for service identity and bootstrapping, but it does not contain the user-uploaded object data. That lives in RADOS (i.e. inside the Ceph cluster). This local directory is more about initialisation, tracking, and state for the radosgw service running on that host.
Step 6: Enable and Start the RGW service
systemctl enable ceph-radosgw@rgw.<hostname>
systemctl start ceph-radosgw@rgw.<hostname>
Note: You may need to restart the service if it doesn’t come up correctly the first time.
If the service isn’t starting, check the logs using journalctl -u ceph-radosgw@rgw.<hostname>.service -n 50 --no-pager. Or, get in touch with us!
Step 7: Confirm it’s working
curl http://localhost:7480Running this curl command will give you something like this in return:
<?xml version="1.0" encoding="UTF-8"?><ListAllMyBucketsResult xmlns="http://s3.amazonaws.com/doc/2006-03-01/"><Owner><ID>anonymous</ID></Owner>
.....
Which basically means it’s listening and responding to calls! Time to connect to it using a familiar face:

Once connected you can create a bucket and upload a file:
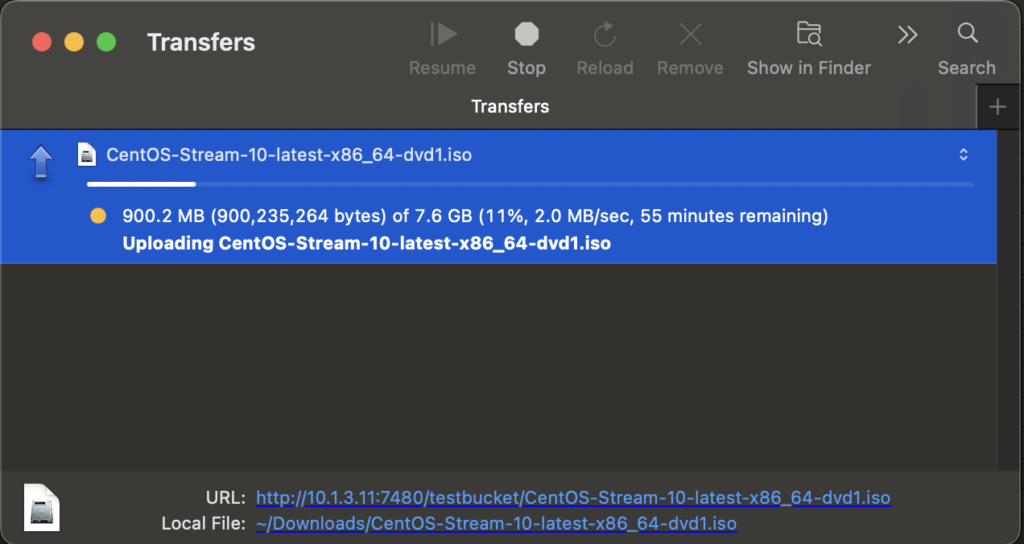
Don’t mind the speed, that’s a limitation of my internet speed, not the Ceph cluster!
Done!
Ceph RGW transforms your Proxmox-managed Ceph cluster into a fully functional, enterprise-grade object storage solution. While this guide covers CLI-based management, stay tuned for our next post where we explore GUI-based solutions for Ceph’s RADOS Gateway (exciting!)